Wednesday, December 28, 2011

Sketchbook in the car


Car trips are  nice ... if I sit in the back, I have a captive model!

Tuesday, December 27, 2011

Sketchbook at Christmas

Mike, sitting under the Christmas tree
David watching tv
Amanda making a t shirt quilt


My sketchbook became a visual diary this year ... here you see the holidays through my pencil.
Movie night

Sunday, December 11, 2011

Teapot Santa

This fellow was fun to draw.    Not sure what I will do with the drawing now that I have it!

Thursday, December 8, 2011

Raindrops on roses ...

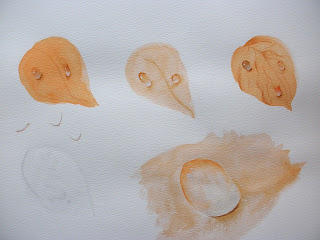
Top .. leaves with drops
Bottom, close up of dew drop

...and whiskers on kittens ... will have to wait for another day.

Today we practiced dew drops on orchid leaves at my Chinese Brush Painting class.


I found this wonderful tutorial online ... link ... but actually I am quite pleased with my own beginning efforts.


My Chinese Brush Painting is coming to an end, and in our final painting class, we did dew drops. 

I am going to post the instructions step by step, mostly because then the next time I want to do a dew drop, I will be able to find my notes!

For a Round Dew Drop
1.  Create 3 puddles - one is pure color, one is color plus complement to tone it down, and one is color plus dark blue and sepia for shadows.
2. Squeeze out a bit of pure white watercolor.

3.  Create the top of your dew drop with pure color, then soften the edges with a second brush dipped in water and nearly dry.

4.  Create the bottom of your dew drop with a curve of white, then soften those edges upward with the nearly dry water brush to blend.  Your white edge going up should nearly touch the pure color coming down.

5.  Use color plus complement to create a shadow under the dewdrop with a curved line.  Soften the edges with your nearly dry water brush.

6.  LET DRY

7.  Use the dark color to create an eyelash shaped line under the base of the dewdrop. It should be a yin/yang line, clearly wider in the center and tapering at the ends.

8.  Create at least 2 highlights with pure white paint at the top of the dewdrop.  If your drop is round, use 2 round dots of different sizes.  If your drop drips, create one slightly longer highlight.

* For a Dripping Drop

1.  Create 3 puddles - one is pure color, one is color plus complement to tone it down, and one is color plus dark blue and sepia for shadows.
2. Squeeze out a bit of pure white watercolor.
* 3.  Draw 2 parallel lines, one shorter than the other, the length of your drop, with pure color.
* 4.  Soften the edges by brushing toward each other with nearly dry water brush.
5.  Create the bottom of your dew drop with a curve of white, then soften those edges upward with the nearly dry water brush to blend.  Your white edge going up should nearly touch the pure color coming down.  Create shadows the same as  from step 5 above.

Wednesday, December 7, 2011

Manga calls


I still love drawing manga.

I watched a Mark Crilley utube and drew this girl of his.

I think my figure drawing class has really helped.  Now I still need to conquer folds and clothing.  And eyes!

She still needs some shading but my fine point mechanical pencil wasn't going to do it for me.

http://www.youtube.com/watch?v=tPny618zN1c

Friday, December 2, 2011

Pamela ... an Optimara Violet

I started drawing my violet today, Mike was watching some dumb movie on tv, and I finished the sketch in a bit better than an hour.


The coloring took quite a bit longer.


Monday, November 21, 2011

3 Way Orchid

Brush painted yin/yang lines
Amy got her Cattleya orchid to bloom and sent me a picture. I drew the orchid for my Chinese Brush Painting class and inked it as we were instructed.

Then I did the watercolor wash, and I am all set for the next class when we learn how to do the botanical linework.

This class is doing the gong bi style, which is very detailed and precise.
Water color wash added.  This is still a work in progress till the next class.

Colored pencil orchid


But my pencils called out and I drew a 2nd orchid, this time with my colored pencils. It will be fun to see which I like the best in the end. 

Wednesday, November 9, 2011

Sketching at the Senior Center

We spent a day doing eyes.


Our brush painting instructor was going to have her class cancelled at the Senior center, so she asked if anyone would like to join.

 Of course I couldn't say no ... so I have been going to the Senior Center for the last few Wednesdays drawing animals.


She taught the basics of shading


We started with the basics of drawing, spent a day on eyes,  then all drew a rabbit from a photo she provided. 

Next we brought in sketches of our own animals and then learned to translate that into a watercolor.


We sketched an animal of our choice - I did Snicks

She had us all do a rabbit together


Snicks is NOT this fat .... yet ....
It was quite different doing watercolor with a Chinese Brush Painting brush -- but I am delighted with the results. 

Wednesday, November 2, 2011

Get the Popcorn


My animation instructor says she will help me "fix" and "finetune" this video. I was absolutely thrilled with it just the way it is!  Guess I am easily amused.

Monday, October 24, 2011

Colored pencil on black

Anubis - a look back

I am really liking the looks of this.

I promised David I would send it to him.

Hope he likes it as much as I do!


Monday, October 17, 2011

Tut tut


My first sketch went off the page
Here's the dog


Tut would have a fit ... our colored pencil class went to the King Tut exhibit and sketched and took photos, we are going to transfer our impressions to black paper. Well, OF COURSE I chose a black dog!


Paula, a most delightful lady,  kept commenting on the shape of his tail, and I walked to the back end to see what her fascination might be. Seemed as good a subject as any ... here is my start.


I plan to use this as an idea for my background
My overall plan

Life is just a work in progress ...

Planning the background

Working on the foreground

Friday, October 14, 2011

French Gray? More leaves

leave with shading
I did another leaf this morning and really enjoyed blending colors to try to match nature's wild abandon. If you saw the piles of leaves in my driveway, each one unique and begging to be drawn, you would understand my awe.

My leaf, however, lacked the depth of the "real thing." So I tried covering it with French Gray, ... whatever that is, not a warm and not a cool, and that didn't do it. Next I added some warm gray ... better, but not right yet.

shaded leaf plus grays, red and green sandwich

Finally I went over the whole leaf with 2 shades of red and a green in between. That complementary sandwich seemed to tone it down for my eye, although my camera still sees differences. I am really enjoying this assignment and have lots of leaves flattening out in a book for later.

Did a LOT of searching on the internet, and apparently French Gray has purple undertones. I am comparing it to the BV 23 grayish lavender copic marker that was one of my first three copics, and has always been a favorite of mine.

Hmmm. wonder what would happen if I tried to color the same leaf using copics. 

Wednesday, October 12, 2011

Colored pencils - leaf


We were supposed to capture the colors of a fall leaf accurately, but I got carried away with my pencils.

 I guess my colored pencil leaf doesn't look at all like the real one, but I was still very pleased with the result.

Saturday, October 1, 2011

Animation Class ... My first movie

Wow ... I can make movies now! Watch out Disney and pixar!

Chinese Brush Painting by a real CAT


 I was practicing my orchids for Chinese Brush Painting class when Fry decided I needed some help.
He added a footprint to this one
Adding a footprint signature

Fry appreciates my chinese brush painting

( By the way, the sample at the top was done by my instructor, not me. )

Sunday, September 25, 2011

French Gray from red and blue

Well, my prismacolors came. No more excuses for not doing my colored pencil homework, well, aside from the excuse that I have no clue how to draw folds.

Back to the internet which is sprinkled with tutorials and utube entries. I think my rendering looks somewhat like the kleenex I crumpled.  And my french gray from red and blue worked fairly well, It wasn't till I saw the photo that I could see how the blue seems to dominate. I will have to work on that!

By the way, I added a pan and some carrots and onions to my previous drawing of an egg on a tshirt. Maybe only I see it as a turkey, but it made me feel good to trivialize it!


Friday, September 23, 2011

Turkeys and Thumbs


I  can't help it. Every time I look at this I think of a raw turkey ready to be stuck in the oven.  I have been meaning to try again, but then I look at this in despair.   Maybe it is switching to a t shirt instead of using a man's handkerchief like the thumbnails we did in class.  ( link to thumbnails )

At any rate, my new pencils are on order and I am hoping they will come before my Monday colored drawing class and I can make a better French Gray.  Yup ... when in doubt, blame the tools!

Fun email today from weeklyartlesson.com --- Lillian Kennedy explained the origin of the term thumbnail and says somebody someplace used to draw his ideas on his thumbnail.  With my fading vision, I am afraid that is an impossibility, I have trouble enough just seeing my thumbnail to clip the nail but it was a fascinating thought.

Tuesday, September 20, 2011

Drawing Class

I am taking a colored pencil drawing class at the art center - and we spent the first hour of class creating "french gray" from colored pencils. She said that you would get a depth of color by using 2 complementary colors that you don't get by using grays. So we layered and layered.
Creating French Gray with complementary colors


There's more than one way to sketch an egg ...


I found this site which also talks about making grays ... and a whole lot more.

We did thumbnail sketches of an egg on a white cloth - she explained the rule of thirds and sweet spots.

Then I started looking for tutorials on drawing eggs ... and of the thousands, I liked the finished look on this one, but not the way it was filmed.

The trouble with never having had art classes is that the simplest thing, like drawing a 3D object, sends me to the internet for tutorials.  But there sure is a lot of support to be found!

Our homework is to create a 6 x 8 composition of an egg on a cloth using colored pencils but ending with gray tones.

Saturday, September 17, 2011

Balloon Fest


Woke up to the sound of hot air balloons overhead.