 |
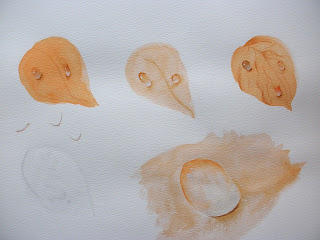
| Top .. leaves with drops Bottom, close up of dew drop |
...and whiskers on kittens ... will have to wait for another day.
Today we practiced dew drops on orchid leaves at my Chinese Brush Painting class.
I found this wonderful tutorial online ... link ... but actually I am quite pleased with my own beginning efforts.
My Chinese Brush Painting is coming to an end, and in our final painting class, we did dew drops.
I am going to post the instructions step by step, mostly because then the next time I want to do a dew drop, I will be able to find my notes!
For a Round Dew Drop
1. Create 3 puddles - one is pure color, one is color plus complement to tone it down, and one is color plus dark blue and sepia for shadows.
2. Squeeze out a bit of pure white watercolor.
3. Create the top of your dew drop with pure color, then soften the edges with a second brush dipped in water and nearly dry.
4. Create the bottom of your dew drop with a curve of white, then soften those edges upward with the nearly dry water brush to blend. Your white edge going up should nearly touch the pure color coming down.
5. Use color plus complement to create a shadow under the dewdrop with a curved line. Soften the edges with your nearly dry water brush.
6. LET DRY
7. Use the dark color to create an eyelash shaped line under the base of the dewdrop. It should be a yin/yang line, clearly wider in the center and tapering at the ends.
8. Create at least 2 highlights with pure white paint at the top of the dewdrop. If your drop is round, use 2 round dots of different sizes. If your drop drips, create one slightly longer highlight.
* For a Dripping Drop
1. Create 3 puddles - one is pure color, one is color plus complement to tone it down, and one is color plus dark blue and sepia for shadows.
2. Squeeze out a bit of pure white watercolor.
* 3. Draw 2 parallel lines, one shorter than the other, the length of your drop, with pure color.
* 4. Soften the edges by brushing toward each other with nearly dry water brush.
5. Create the bottom of your dew drop with a curve of white, then soften those edges upward with the nearly dry water brush to blend. Your white edge going up should nearly touch the pure color coming down. Create shadows the same as from step 5 above.
1 comment:
These are so realistic! I love this, and will have to try it. Thanks for the instructions.
Post a Comment