Showing posts with label Chinese Brush Painting. Show all posts

Thursday, November 8, 2012

Christmas Chrysanthemums!


There are so many ways to do a Chinese Chrysanthemum brush painting.

 My teacher, Louise Chen, said you can paint it in color then outline, you can do the outline then paint it, you can just outline, or use just paint.

.... but my idea is to just make them all into Christmas cards which is what I intend to do!


Friday, November 2, 2012

Chinese Chrysanthemums

I just started a Chinese Brush painting class in chrysanthemums. 

Louise Chen does an incredible job of describing the culture and its relationship to art.  The chrysanthemum is the fall flower, when all the other wild bloomers have ended and there is a focus on wisdom and relaxation.  She likened it to people in their 60s. They have done what they had to do and now can reflect.

Hmm. Time for reflection!

This one is on double shuen rice paper

We practice on coffee filters to see how ink will run.

I need to work on my vases!

This is on double shuen rice paper.

More on rice paper.

Ok I really like this pot. Not terribly Chinese, but I like it!

Another one on a coffee filter.
I did some reading online and found that this flower is a good gift for an older person since it indicates strong life.  But another source said that in Belgium and Austria they are particularly associated with funerals.  I find it so interesting to see the meanings associated with this flower!  But I am spending too much time reading online, I should be practicing how to paint it!

Friday, October 19, 2012

Been busy with a Chinese brush ... 
You can see the top of my head on the far left, and my goldfish creation, dead center.


Wednesday, August 22, 2012

Chinese Brush Painting Class

First we did stems

Then we did leaves

Then we did small branches

Then we learned to write "Peace" in Chinese Calligraphy

This was my at-home practice

More practicing at home
What a wonderful, peaceful morning!

I really enjoy Chinese Brush Painting although it is a sign that fall is coming and I hate to see summer end.

Thursday, December 8, 2011

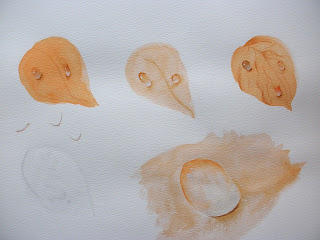
Raindrops on roses ...

Top .. leaves with drops
Bottom, close up of dew drop

...and whiskers on kittens ... will have to wait for another day.

Today we practiced dew drops on orchid leaves at my Chinese Brush Painting class.


I found this wonderful tutorial online ... link ... but actually I am quite pleased with my own beginning efforts.


My Chinese Brush Painting is coming to an end, and in our final painting class, we did dew drops. 

I am going to post the instructions step by step, mostly because then the next time I want to do a dew drop, I will be able to find my notes!

For a Round Dew Drop
1.  Create 3 puddles - one is pure color, one is color plus complement to tone it down, and one is color plus dark blue and sepia for shadows.
2. Squeeze out a bit of pure white watercolor.

3.  Create the top of your dew drop with pure color, then soften the edges with a second brush dipped in water and nearly dry.

4.  Create the bottom of your dew drop with a curve of white, then soften those edges upward with the nearly dry water brush to blend.  Your white edge going up should nearly touch the pure color coming down.

5.  Use color plus complement to create a shadow under the dewdrop with a curved line.  Soften the edges with your nearly dry water brush.

6.  LET DRY

7.  Use the dark color to create an eyelash shaped line under the base of the dewdrop. It should be a yin/yang line, clearly wider in the center and tapering at the ends.

8.  Create at least 2 highlights with pure white paint at the top of the dewdrop.  If your drop is round, use 2 round dots of different sizes.  If your drop drips, create one slightly longer highlight.

* For a Dripping Drop

1.  Create 3 puddles - one is pure color, one is color plus complement to tone it down, and one is color plus dark blue and sepia for shadows.
2. Squeeze out a bit of pure white watercolor.
* 3.  Draw 2 parallel lines, one shorter than the other, the length of your drop, with pure color.
* 4.  Soften the edges by brushing toward each other with nearly dry water brush.
5.  Create the bottom of your dew drop with a curve of white, then soften those edges upward with the nearly dry water brush to blend.  Your white edge going up should nearly touch the pure color coming down.  Create shadows the same as  from step 5 above.

Monday, November 21, 2011

3 Way Orchid

Brush painted yin/yang lines
Amy got her Cattleya orchid to bloom and sent me a picture. I drew the orchid for my Chinese Brush Painting class and inked it as we were instructed.

Then I did the watercolor wash, and I am all set for the next class when we learn how to do the botanical linework.

This class is doing the gong bi style, which is very detailed and precise.
Water color wash added.  This is still a work in progress till the next class.

Colored pencil orchid


But my pencils called out and I drew a 2nd orchid, this time with my colored pencils. It will be fun to see which I like the best in the end. 

Saturday, October 1, 2011

Chinese Brush Painting by a real CAT


 I was practicing my orchids for Chinese Brush Painting class when Fry decided I needed some help.
He added a footprint to this one
Adding a footprint signature

Fry appreciates my chinese brush painting

( By the way, the sample at the top was done by my instructor, not me. )